In this blog, we lay out 5 stretches every cyclist should know. Why? Because cycling isn't just about what you do when you're in the saddle—it's just as much about what you do when you're out of the saddle.
Let us explain.
Like wholesome nutrition, quality sleep, and the proper gear, stretching is widely recognized for enhancing cycling performance. Think about it: The act of cycling is an awfully repetitive linear (versus lateral) movement that stops short of engaging the body's full range of motion. After a while, it can be hard on the neck, shoulders, back, and hips, and can tighten the quadriceps, hamstrings, and hip flexors. If you've been a weekend warrior all summer, then you're probably already feeling the brunt of those long hours in the saddle.
Beyond this, stretching (and the enhanced flexibility that results from it) could potentially improve your riding position (and who doesn't want to optimize their aero position to get a 'leg up' on the competition?). While we hate to be the bearer of bad news, most people (albeit certainly not all) would argue that cyclists would benefit from getting into the habit of stretching after rides (particularly those century+ rides) to balance the 'tightening' impact of cycling on the body with exercises that help to elongate the muscles.
We get it: Stretching isn't always desirable (especially if you have to untangle stubborn knots in your aching muscles). But treating it like a ritual could enhance how you feel after your rides, and reduce your risk of injury during your rides.
In this beginner's guide, we borrow from our own experience as cyclists to share 5 stretches every cyclist should know. Naturally, many of the stretches we present below are inspired by yoga postures. They are generally accessible stretches for most people, but—as with everything—it's entirely up to you to decide if they're right for your body and unique needs. Listen to your body to figure out what suits you (and remember that stretching should never feel too painful). We're simply cyclists sharing our favourite cycling stretches after riding, but you have to decide what works for you.
Before You Start
Before we get going, we typically ensure we have a handful of simple props to support our stretches; specifically:
- A yoga mat (or a thick towel)
- A yoga block (or a pillow)
- A chair (for those who prefer to perform the figure 4 stretch in a seated position)
- A stopwatch, watch, or clock of any kind (if you want to rigorously time your stretches—otherwise, 'one-Mississippi, two-Mississippi, ...' will do just fine; alternatively, counting your inhales and exhales is a perfectly fine way to track time and stay present in your stretch); or maybe you still have your bike computer at arm's length
- A wall (try to set up near a wall, which will support the wall calf stretch below)
- A foam roller (optional)
Now, onto the 5 stretches every cyclist should know!
Stretch #1: Figure 4
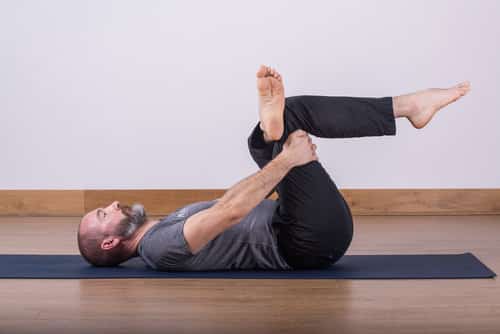
Photo credit: Mind and Body Movement
We like to ease into our stretching sequence on our backs (pro tip: roll out a yoga mat onto the floor to provide a more comfortable set up before you get your stretch on).
This stretch primarily targets the glutes, the lower back, and the hips.
Start by lying on your back with your legs long and your arms resting along your body (pretend you're in shavasana in a yoga practice). Next, plant your feet firmly into the mat. We like to start with our right side. Bend your right knee and cross your right ankle over your left knee. In essence, you're creating a number four shape with your legs.
From there, reach for the back of your left thigh—with both hands—and interlace your fingers (don't worry about your thumbs) to achieve a firm grip behind your left leg. Once in position, you should feel a decent stretch in the glutes (and a decent hip opening sensation).
Hold the stretch for a few seconds, and switch sides. When you're done, return both feet onto the mat then, from there, settle back into shavasana for a couple of seconds.
As an aside, there is a seated variation of this stretch, which could serve as a handy modification for those who aren't fans of performing the figure 4 stretch on their back. Simply use a chair for this modification.
Stretch #2: Supine Spinal Twist
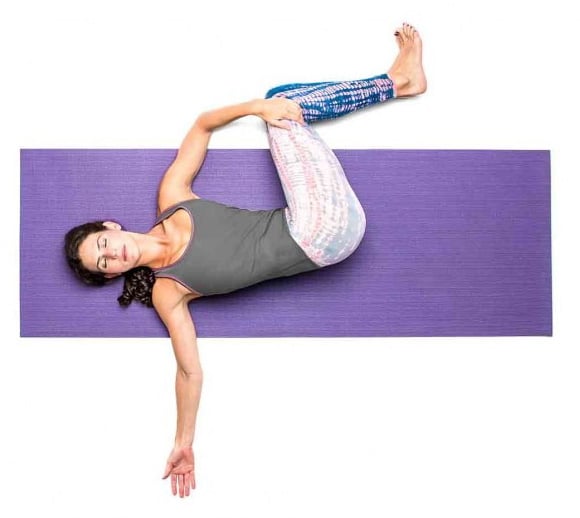
Photo credit: Gaia
Staying on our back (our preference is to 'flow' from one stretch to the next—not unlike a yoga practice—rather than jumping around from our backs to a seated position to standing and back again), we like to move into a supine spinal twist next.
This stretch can help to release tension in the spine, lower back, and even your neck and shoulders (plus, it gives us another couple of minutes or so to stay in a relatively rest-like position, which we are always grateful for, particularly if we've been on a 'chase a Strava King, or Queen, of the Mountains crown on Strava' kind of ride).
To move into this stretch, extend your arms out wide in opposite directions. This, on its own, can invite an opening sensation through the shoulders, particularly after you've been crouched over your bike for several hours. From there, bend your knees into your chest, giving them a tight squeeze (this can help relieve that 'stiff' feeling in the lower back).
With your knees bent at a 90 degree angle, roll them over to the right side, and rest them on the yoga block or pillow that you have handy (or anything that will provide a more gentle landing for your knees). Bring your left cheek over to the left (this will invite a slight stretch through the neck). Hold this position for a few seconds, and switch sides.
For those who are so inclined, there are more advanced variations of this stretch. For example, you could gradually straighten out your legs and try to reach your toes toward the hand nearest them. Alternatively, for those who are keen on deepening this stretch, an advanced variation is to cross, or twist, your legs (like you would in Eagle Pose).
As always, bring your legs back to center, and stretch your arms and legs flat along the floor. From here, settle back into shavasana to reset your body for a couple of seconds in between stretches.
Stretch #3: Kneeling Lunge
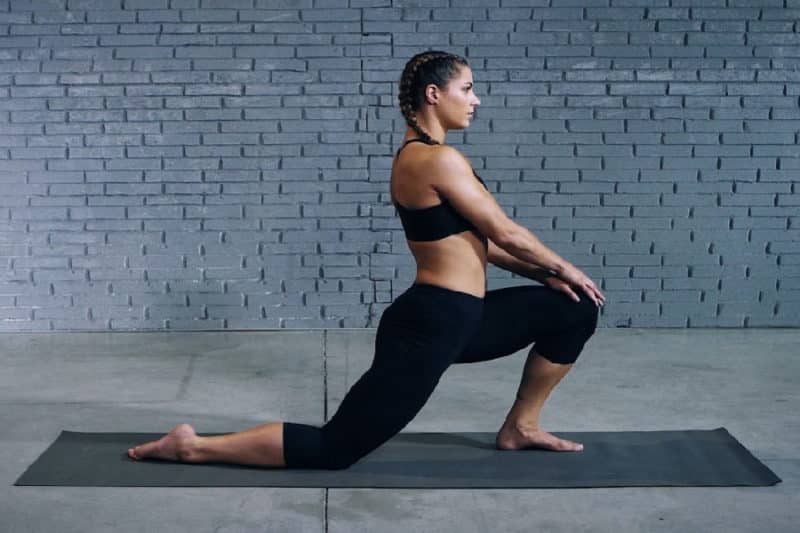
Photo credit: EVO Fitness
Roll onto one side and make your way into a seated position. Alternatively, if you prefer to 'flow' from one stretch to the next, bring your hands behind your thighs (one hand on each thigh) and rock back and forth two, maybe even three, times. Then, cross your legs at the ankles and—from there—make your way up into a seated position on your mat (fun, right?).
Kneeling lunges are typically a simple and accessible stretch for targeting the hip flexors, which have the tendency to tighten when we cycle (the muscles are prone to shorten because of cyclists' forward-leaning position on the bike). Stretching after your rides can serve to mitigate the impact of cycling on the hip flexors.
From a seated position, make your way up onto your knees. Keep one knee in a kneeling position (pro tip: slip a pillow underneath your knee to ease any pain you may feel, particularly if you're stretching on hard-surface flooring). Bring the other leg (again, we like to start with our right side for consistency) into a 90 degree angle into a forward lunge position with the foot planted firmly into the mat (imagine a straight line from the knee that is resting on the mat up to your hip and through to your shoulder).
You can bring your hands onto your hips or, alternatively, onto your forward knee for stability and to help keep you upright. From this resting position, gently push your hips forward as you lean into the forward knee. Hold this for a few seconds, return to the original position, and switch sides.
If you're craving a stretch through your quadriceps, too, lift your back foot off the mat toward your glutes (you should feel a perceptible stretching sensation along the quad of the leg you're lifting). Remember: Always listen to your body and back off if it feels too intense (stretching is intended to be restorative—not painful).
Stretch #4: Downward Dog

Photo credit: Health Digest
To transition from your kneeling lunge to everyone's favourite—downward dog—make your way back onto your knees (again, you can slip a pillow or towel underneath your knees for more support). Bring your palms flat onto the mat into a simple tabletop position (in other words, make your way onto all fours). From there, lift your knees up off the mat and move into downward-facing dog.
This stretch is a simple, yet effective, way of stretching the hamstrings while relieving tension along the spine and shoulders.
Generally, the feet are positioned approximately hip-width distance apart (an easy way to measure this is to make fists with both your hands and place them in between your feet). If your hamstrings are very tight, you could relieve the tension by inviting a soft bend through your knees. Your heels could either be planted firmly into the mat or, if that's too difficult, they could be slightly lifted up off the floor.
Place your palms flat on the mat in front of the shoulders, actively pressing your fingers down into the floor for a more active stretch. If you want to make this a dynamic stretch, you have the option of lifting your heels—one at a time—up off the mat (just like you would at the start of a yoga class to ease into your practice). You should begin to feel a gentle stretch through the back and hamstrings.
Don't forget about your neck and shoulders. We have a natural tendency to hold tension there (even while stretching). Try to bring your awareness to your neck and shoulders, and be mindful about releasing any tension you might be holding there while in this posture.
Stay in downward dog for a few inhales and exhales. Namaste!
Stretch #5: Wall Calf Stretch
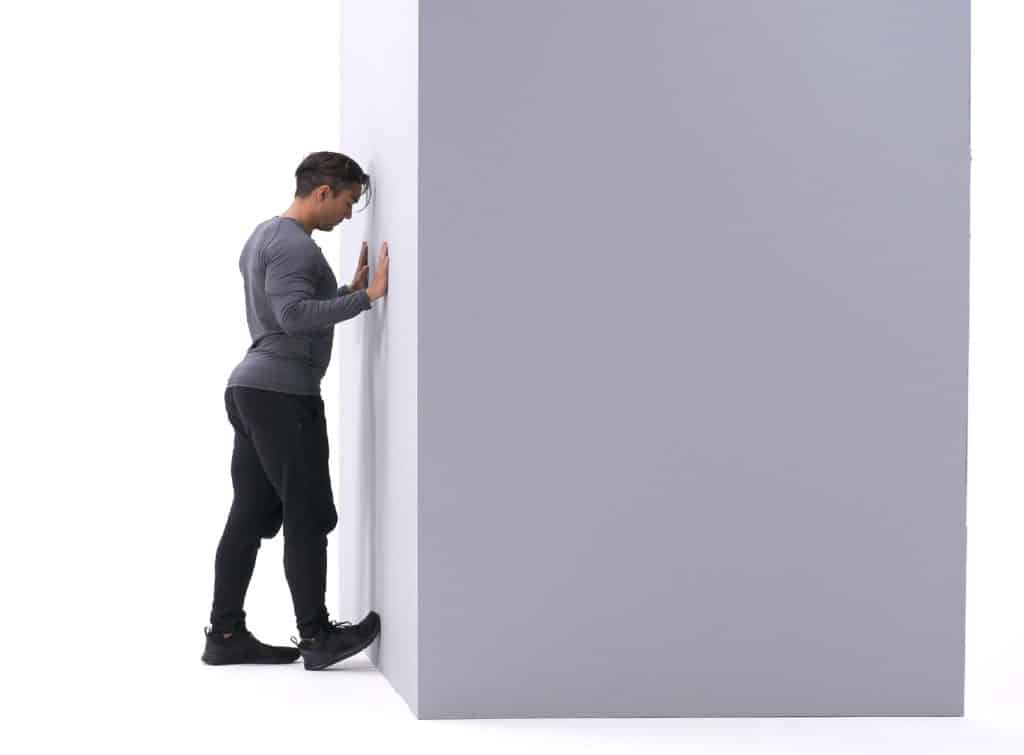
Photo credit: Bodybuilding.com
Last but certainly not least, is a well-deserved calf stretch.
If you, like us, prefer a smooth transition between stretches, then—from downward dog—walk your hands back toward your feet and roll yourself up to a standing position (before making our way to an upright position, we typically hang out in a ragdoll pose by catching our opposite elbows and swaying back and forth for a couple of inhales and exhales). Once you're standing, make your way toward a wall.
As cyclists, we're constantly working our calves as we apply force onto our pedals to propel us forward. That's why we try to give them a bit of love during our post-ride stretching routine. This stretch is pretty straightforward (it's among our favourite post-run stretches, too, and you'll often spot runners performing this stretch against a lamppost or building).
To start, simply make your way toward a wall and face it with your shoulders squared to the wall and toes pointing forward. Place your palms flat against the wall in front of you (typically at about shoulder height). Bring your left leg slightly behind you and keep your left foot flat on the floor (left toes still pointing forward). From there, position your right toes against the wall while keeping your right heel on the floor.
Now, gently, lean forward over your right leg (while keeping your left leg straight and your left heel planted into the floor) to feel the stretch sensation in your calf (as always, back off if you feel any pain).
That's it! Hold this position for a few seconds, and repeat the stretch on the other side.
So, Now What?
These 5 stretches every cyclist should know are relatively beginner-type postures that are accessible to most people. They are among our favourite post-ride stretches because they gently target the neck, shoulders, back, glutes, hips, quads, hamstrings, and calves. Needless to say, they are not a silver bullet, and there are countless other stretches out there to accommodate your own unique needs. Start by figuring out what works for you.
At a minimum, stretching after your rides can support both your recovery and your conditioning and performance for your next ride. Depending on your own stretching routine (and how much effort you exert on your rides), it can be as simple as a few minutes.
Last but not least, if you have a foam roller handy, you might want to reach for it (we certainly do!) when stretching. Foam rollers can be an effective tool for releasing the tightness and soreness you feel in your muscles (even after stretching). We typically use one to roll out our glutes, hamstrings, quads, and calves.
From there? Go ahead and indulge in that cool bevvy you promised yourself earlier ahead of climbing that daring ascent - you've earned it.